Hi Everyone!
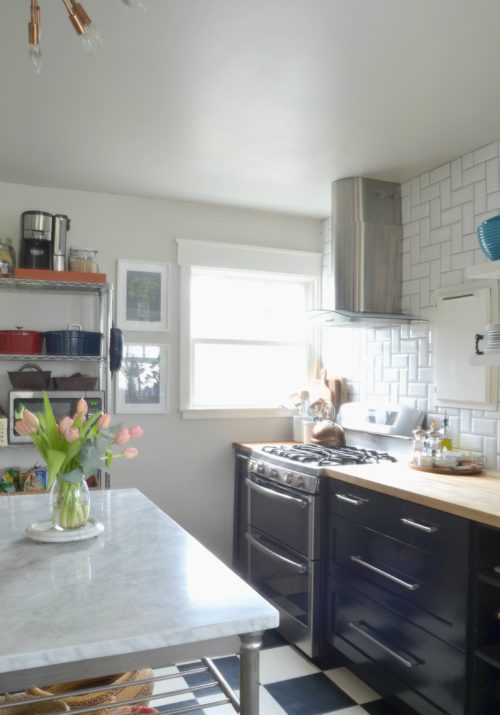
We have countertops! When it came time to decide on a material, for me, the decision was easy. I love butcher block counter tops, and I knew the second I walked in to this kitchen they’d be perfect for it. Naomi wasn’t as easily convinced, but she’s completely on board now that they’re in.
We ordered two 8 ft slabs of Ikea Numerar block in birch. There is also a beech option, which has a red undertone. I called in some help to make the cuts because I was worried about the corner sink. To minimize the number of cuts we’d need to make I used a piece of the cardboard packaging and placed it on the cabinets to make a template for a more precise measurement. The cardboard was the same length and width of the slab so once we determined where the cuts would go, we cut out the template and traced it directly on to the slab. It made things really easy and there was no stress over measurement errors. We ended up with a cut connecting the slabs at the center of the sink.

Wood putty helped to blend the pieces. After the counters we installed the faucet and began the process of sealing and conditioning the wood. There are lots of different methods of sealing butcher block counters and the route you choose will depend on how you plan to use them. I did a lot of research and in the end I opted to go with a mineral oil and wax combo. I really wanted to use a natural method to prepare the wood, and mineral oil has stood the test of time as being the way to go for wood counters.
My initial application was extremely liberal. After hand sanding off the thin factory layer of protective coating that comes on the butcher first with 180, then with 220 grit sandpaper, I slathered a thick layer of the mixture onto the countertops with a cotton cloth and let it sit for a few hours. We actually ended up going out for a while so the wood had a chance to really soak in the oil. I then buffed in any remaining oil with a clean cotton cloth. I repeated this process everyday for a week. The general rule of thumb for conditioning new butcher counters is to oil them once a day for a week, once a week for a month, then maybe once a month thereafter. The only area I did not use oil to seal was the end grain around the sink area. Because of the regular exposure to water for this area I used 4 coats of oil based poly.
In hindsight I would highly recommend the wipe on formula. It will give you a lot more control during application.
Weve been living with them for a couple of weeks now and so far so good. Water intrusion was a big concern for me so Im glad to see water bead up the minute it lands on the wood.

I love their natural texture and lustre the oil provides. When I think of a cottage kitchen I envision a collected space with warm, worn in wood counters. I really want these counters to embody that vision and age with wear over time. Even though I wont cut directly on them, I want them to get a little beat up. I don’t want them to look brand new three years from now so I shyed away from anything that would essentially preserve the newness. Plus with mineral oil there’s no fumes, no curing time, and its cheap! Wood counters have been around for ages, and they are a lot tougher than people give them credit for. As long as you are aware of the basics in caring for them, they’ll last for generations.
Besides, I’m not a fan of stainless steel appliances (these were a compromise) and the wood really helps juxtapose the cold hard material with their warm earthy texture.
We opted for a non mitered waterfall edge at the last minute. I love it, but in doing so we didn’t have enough counter for the small cabinet on the other side of the stove!
Im hoping to avoid having to order a whole six foot slab of butcher for this small space so im browsing craigslist daily in hopes I can find a remnant piece.
The cabinet doors have been ordered and should be arriving in about 6 weeks. At this point im just happy to have a functioning kitchen.
We’ve been having some connectivity issues since moving in the house to the tune of 2 weeks with no internet! Can you believe that? Instagram has definitely made it easier to deal with. It feels good to be back, and with a fresh new look. I’ve been working on updating the site since before we moved, so its nice to finally have it up and running. Im still twerking out some minor details but overall its a welcome change. Thank you all so much for sticking with me. Until next time…
Xo-Shavonda


Katja | Shift Ctrl Art says
Oh this is turning out soooo good. I LOVE those counters. We did a butted edge on our peninsula as well. We also used those IKEA counters, just the oak ones. They have held up so well up until now. Love them!!
shavonda says
I wish they still offered the oak ones. We are loving the birch so far though:)
Shelia says
I got to thinking about your tiny countertop next to the range/stove. What about maybe finding a small piece of stone? Wouldn’t be too expensive for that, and it would be heat tolerant, which is good for a surface that MIGHT have pots set on it. Just a thought. Not sure if marble, quartz, granite, soapstone or some composite material fits your scheme.
It is looking lovely! 🙂
shavonda says
Hi Sheila! You know what, I love that idea and I seriously considered that when I ran out. Im actually going to be doing that for the small section within the corner sink:) I plan to use that area for plants and herbs so having a material thatll be a bit more water tolerant like stone will be key. Im gonna keep the butcher block going over in the corner for continuity. I dont want it to seem broken up. Its such a small kitchen I want your eye to relate it as one space and not as “the forgotten corner”. Lol. I love the way you think though friend. Thank you so much for your input;)
cassie says
wow- i love the countertops! i wanted to do waterfall in ours but we didn’t really have the right space for it- yours look amazing! love your new rug, too!
shavonda says
Thank you so much Cassie:)
Katrina says
The kitchen counters turned out fantastic!!
shavonda says
Thank you so much Katrina. We are really loving them so far!